Exploring the Basics of Gelli Plate Printing
Gelli plate printing is an exciting and versatile printmaking technique that opens up a world of artistic possibilities. Whether you’re an experienced artist or just starting, understanding the basics of Gelli plate printing can help you unleash your creativity. In this post, we’ll guide you through essential techniques for Gelli plate printing and introduce some advanced methods like image transfer, all designed to inspire your next project.
Materials Needed
Before diving into Gelli plate printing, gather the following essential materials:
- Gelli Plates: Flexible, gel-like plates used for printing.
- Acrylic Paints: Various colours to create vibrant prints.
- Brayers (Rollers): Tools for evenly spreading paint on the plate.
- Stencils: For creating specific shapes and patterns.
- Textured Materials: Leaves, lace, bubble wrap, or other textured items to add visual interest.
- Paper: Different types and sizes to print on.
- Palette Knives: For applying and manipulating paint.
- Paintbrushes: For adding details and textures.
- Disposable Gloves: To keep your hands clean.
- Aprons or Old Shirts: To protect your clothing.
- Paper Towels and Wipes: For easy cleanup.
Basic Techniques
Preparing Your Workspace
- Set up a clean, flat surface with all your materials within reach.
- Wear gloves and aprons to protect yourself and your clothing.
Applying Paint
- Use a brayer to apply a thin layer of acrylic paint to the Gelli plate. Roll the paint evenly to create a smooth base layer.
- Experiment with different colours and paint consistencies for various effects.
Creating Textures and Patterns
- Textured Materials: Press items like bubble wrap, leaves, or lace onto the paint before printing to create interesting textures.
- Stencils: Place stencils or masks on the plate to create specific shapes. The areas covered by the stencil will remain unpainted, giving a contrasting effect.
Printing Your Design
- Once you’re happy with the paint and textures on the plate, carefully place your paper or fabric onto the plate.
- Gently press or rub the surface to ensure even contact.
- Peel the paper or fabric off to reveal your print. Each print will be unique, showcasing the textures and patterns you created.
Advanced Techniques
Ghost Prints
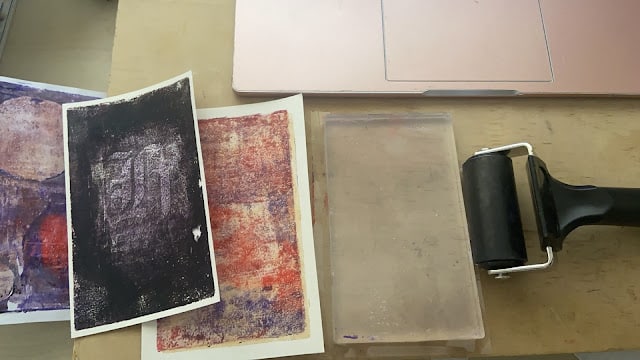
- Definition: A ghost print is a lighter version of your original print. It captures the faint residual paint left on the plate after the first print.
- Technique: After removing the first print, press a new sheet of paper onto the Gelli plate to capture the remaining paint. Ghost prints add depth and subtle details to your artwork.
Layering
- Definition: Layering involves applying multiple layers of paint or textures to build complex and rich prints.
- Technique: Allow each layer to dry before applying the next. Combining different colours, textures, and patterns can result in unique and visually engaging prints.
Using Stencils
- Definition: Stencils are templates used to create shapes or patterns on your print.
- Technique: Place stencils on the plate before applying paint. Areas covered by the stencil will remain unpainted, allowing for intricate designs and patterns.
Printing with Textured Materials
- Definition: Textured materials create unique patterns and effects on your prints.
- Technique: Press items like bubble wrap, lace, or leaves onto the plate after applying paint to create textured impressions on your print.
Incorporating Plants
- Definition: Plants can serve as natural stencils or texture makers.
- Technique: Use leaves or other plant materials directly on the plate or as stencils to imprint their shapes onto your print.
Image Transfer
- Definition: Image transfer is the process of transferring printed images onto your Gelli plate print.
- Technique:
- Print your image with an inkjet or laser printer.
- Apply a thin layer of acrylic paint to the Gelli plate or another surface.
- Place the printed image face down onto the wet paint.
- Press evenly and allow it to dry until the paint is slightly tacky.
- Gently rub away the paper to reveal the transferred image.
Cleaning Your Gelli Plate
After printing, clean your Gelli plate with water and mild soap to remove any remaining paint. Be sure to dry it thoroughly before storing it to maintain its condition for future use.
Tips for Success
- Experiment: Gelli plate printing is all about creativity. Try different techniques, colours, and materials to discover exciting effects.
- Practice: As with any art form, practice makes perfect. Experiment with different methods to find what works best for you.
- Ghost Prints: Use ghost prints to add depth and variation to your artwork. They’re also a great way to use up leftover paint and create unique backgrounds.
- Image Transfer: Use image transfer for added creativity. Ensure you apply thin layers of paint and let it dry slightly tacky for the best results.
Conclusion
Gelli plate printing is an accessible and fun technique that encourages creativity and experimentation. By mastering basic techniques like layering, ghost prints, and image transfer, you can create beautiful, unique prints. Whether you’re making art for personal enjoyment or working on a project, Gelli plate printing offers a rewarding and engaging experience.
Happy printing!
You May Also Like

Watercolour Mediums Comparison: Schmincke vs. Winsor & Newton
25/12/2023
Acrylic Paints 101: Your Ultimate Guide to Starting with Acrylics
19/12/2023
